A step by step guide to registering a custom Azure application for interactive MSGraph PowerShell. The example will create an app for use with the Show-Win32AppUI tool.
Why use a custom app?
The Microsoft Graph enables access to a wide scope of Azure / Microsoft 365 providers and resources. A compromised Global Administrator account or errant script could cause widespread damage very quickly.
A custom Azure application can limit MS Graph access to specific requirements of a PowerShell script, reducing the risk.
Disable user consent
The first step is to prevent users granting application consent. User consent is enabled by default and presents a risk of unwanted access to company data.
In the Azure AD portal, navigate to Enterprise applications and then Consent and permissions.
Many companies change the setting to Do not allow user consent. Note that this does create an admin overhead, so you could look into the advanced options of defining low-risk permissions or using conditional access.

The following admin roles can then grant application consent:
- Cloud App Administrators
- Global Administrators
Clean-up Microsoft Graph PowerShell
If you want to implement Custom Apps for access to MSGraph, you should first review and remove excess permissions from the Microsoft Graph PowerShell app. Over time administrators may have consented to more and more permissions.
It isn’t possible to remove permissions or revoke consent in the admin portal, but it does provide the PowerShell commands.
In the Azure AD portal, navigate to Enterprise applications
In the All applications view, select Microsoft Graph PowerShell and then Permissions
Click Review Permissions

Select This application has more permissions that I want. The following PowerShell is displayed (uses the AzureAD module):
Connect-AzureAD

# Get Service Principal using objectId
$sp = Get-AzureADServicePrincipal -ObjectId "1aded007-dfd1-49cc-8b70-9923a4f53a05"

# Get all delegated permissions for the service principal
$spOAuth2PermissionsGrants = Get-AzureADOAuth2PermissionGrant -All $true| Where-Object { $_.clientId -eq $sp.ObjectId }

# Remove all delegated permissions
$spOAuth2PermissionsGrants | ForEach-Object {
    Remove-AzureADOAuth2PermissionGrant -ObjectId $_.ObjectId
}

# Get all application permissions for the service principal
$spApplicationPermissions = Get-AzureADServiceAppRoleAssignedTo -ObjectId $sp.ObjectId -All $true | Where-Object { $_.PrincipalType -eq "ServicePrincipal" }

# Remove all delegated permissions
$spApplicationPermissions | ForEach-Object {
    Remove-AzureADServiceAppRoleAssignment -ObjectId $_.PrincipalId -AppRoleAssignmentId $_.objectId
}
Custom app Step by Step
The following steps create a new application with delegated API access to MSGraph, suitable for use from a PowerShell script. The permissions are specific to the Show-Win32AppUI
Open the Azure AD portal and select App registrations
Click on New Registration to start the process

Enter a name for the application and select the single tenant option. Do not enter a redirect URI at this stage.

Click on Register
The application is created and the admin center shows the Overview page.
Click Add a Redirect URI

The authentication step is displayed. Click on Add a platform

Select Mobile and desktop applications

Enable the nativeclient URI to support PowerShell 5.1 scripts. Add a custom redirect URI of http://localhost to support PowerShell 7.x scripts.

Click Configure to save the URIs
Now back on the Authentication page, ensure the following options are set:
- Supported account types = Accounts in this organizational directory only
- Allow public client flows = No

Click API permissions in the left pane
User.Read delegated access is already assigned by default. Click Add a permission

Select the Microsoft Graph API

Select Delegated permissions

Search for each of the following delegated permissions, enable and click Add permissions
- DeviceManagementApps.ReadWrite.All

Repeat the process to add permissions for the following:
- Group.ReadWrite.All
- GroupMember.ReadWrite.All
- Directory.AccessAsUser.All
The API permissions page will show the list of added permissions with a warning that consent is not granted.
Click Grant admin consent for

The warnings will be replaced by a green tick.
Return to the application Overview page and note the Application (client) ID - this will be used to authenticate
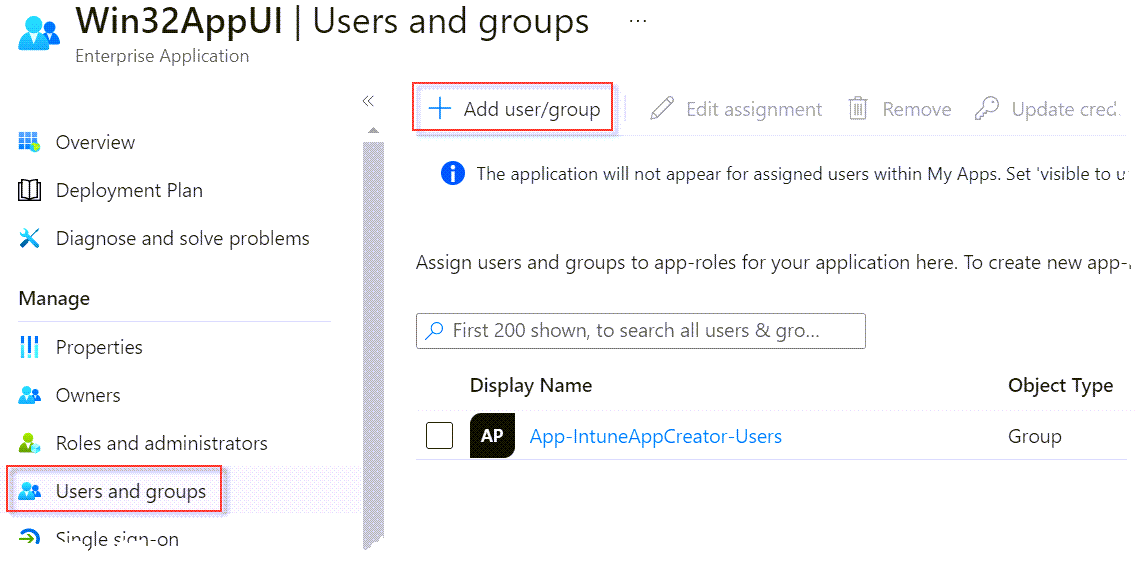
Add assignment restrictions
By default anyone in the tenant can access the application (although they need Role permissions to make changes in Azure AD and Intune). This step will limit access to a specific group.
View the Properties page of the app and change Assignment required to Yes

Next click on Users and groups then add user/group. Select the required Azure AD group and Assign. Only members of this group can authenticate using the app.
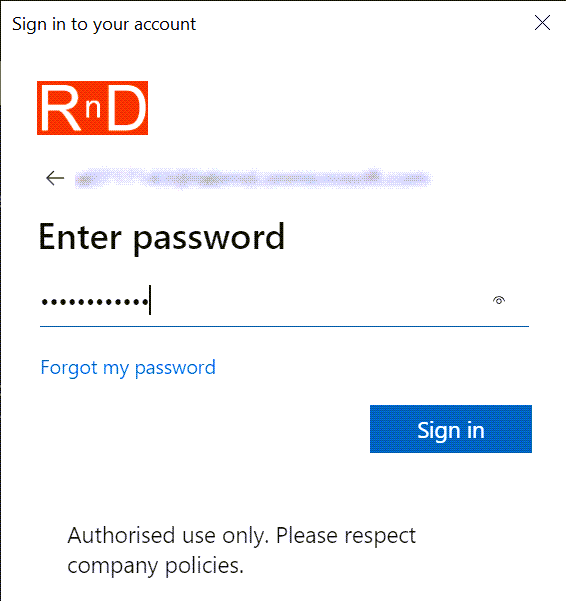
Authenticating using the custom app
Delegated consent uses the intersection of application permissions and user permissions to authorise access. i.e. the authenticated user must have the required permissions as well as the application.
Use interactive authentication to provide credentials with the required role permissions. Interactive auth prompts using the familiar browser page:
Examples of PowerShell authentication using the app are below:
MSAL.PS authentication
$TenantID = <your tenant ID obtained from the AAD Overview page>
$ClientID = <application ID of the custom app>

$Token = Get-MSALToken -TenantID $TenantID -ClientID $ClientID -Interactive
IntuneWin32App authentication
$TenantID = <your tenant ID obtained from the AAD Overview page>
$ClientID = <application ID of the custom app>

Connect-MSIntuneGraph -TenantID $TenantID -ClientID $ClientID -Interactive
The Connect-MSIntuneGraph command in the IntuneWin32App module creates global variables to store the token for later use:
- $Global:AuthenticationHeader
- $Global:AccessToken
This article was originally posted on Write-Verbose.com