Part one of a deep dive series on Purview Sensitivity Labels:
Part 1 - Manual Labelling
Part 2 - Automatic Labelling
Part 3 - Recommendations and Limitations
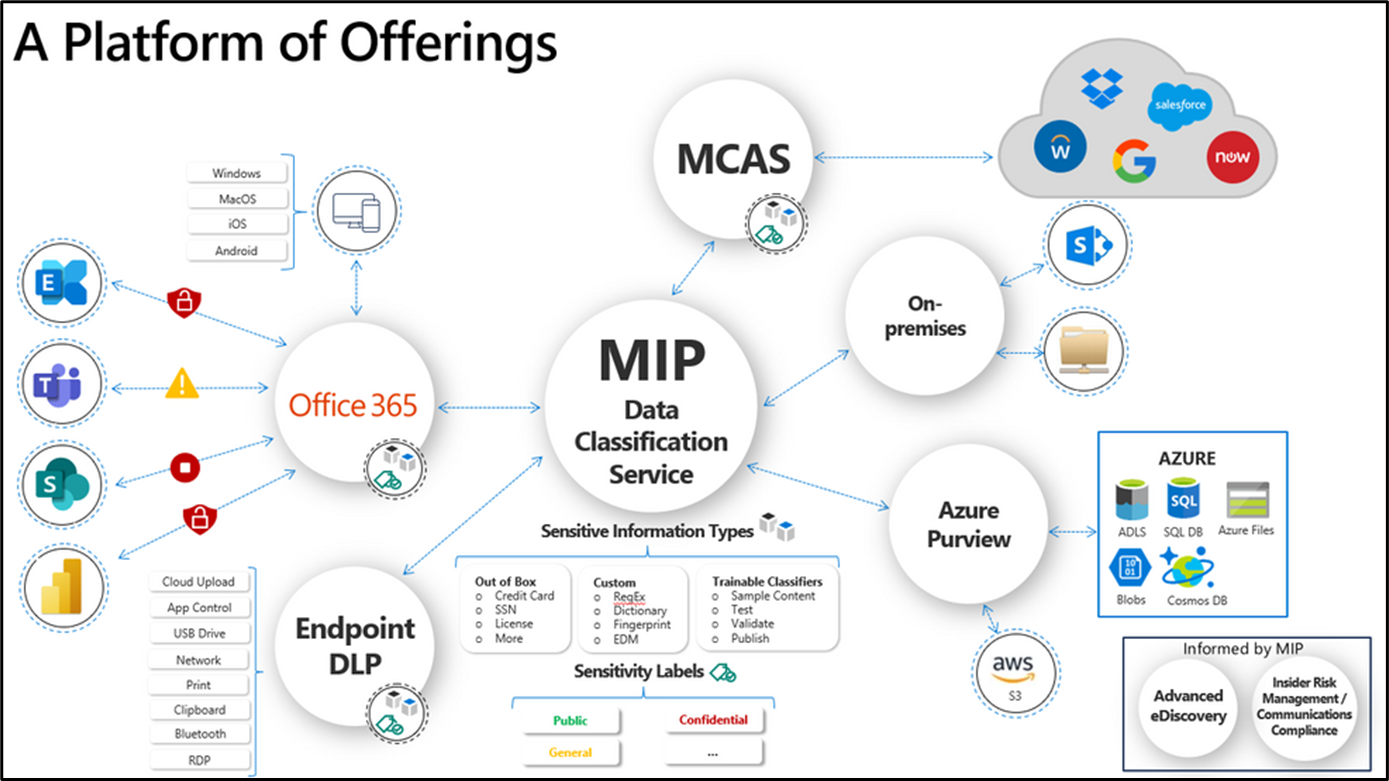
Purview Information Protection (formerly AIP and then MIP) uses Labels to categorise data based on sensitivity and privacy requirements. Settings and Policies linked to the labels apply security controls. This article is a deep dive on Information Protection, including design and configuration.
Sensitivity Labels are metadata added to items and containers to identify and enforce privacy constraints using simple descriptions, such as Company Confidential or Secret.
Labels and Label Policies are part of the M365 Data Classification Framework
Label Scope
Applying Labels and Label Policies to Items is known as Information Protection.
Items can be:
- Files (Word, Excel, PowerPoint etc)
- Email messages
- Calendar events and meetings
- Teams meetings and chats (Teams Premium license required)
M365 Apps (Office) files must be in the Open XML format e.g. docx, xlsx. Older formats such as .doc are not supported.
Applying Labels and Policies to Containers is known as Container Management.
Containers (a.k.a Groups & Sites) can be:
- SharePoint Online sites
- Teams
- M365 Groups
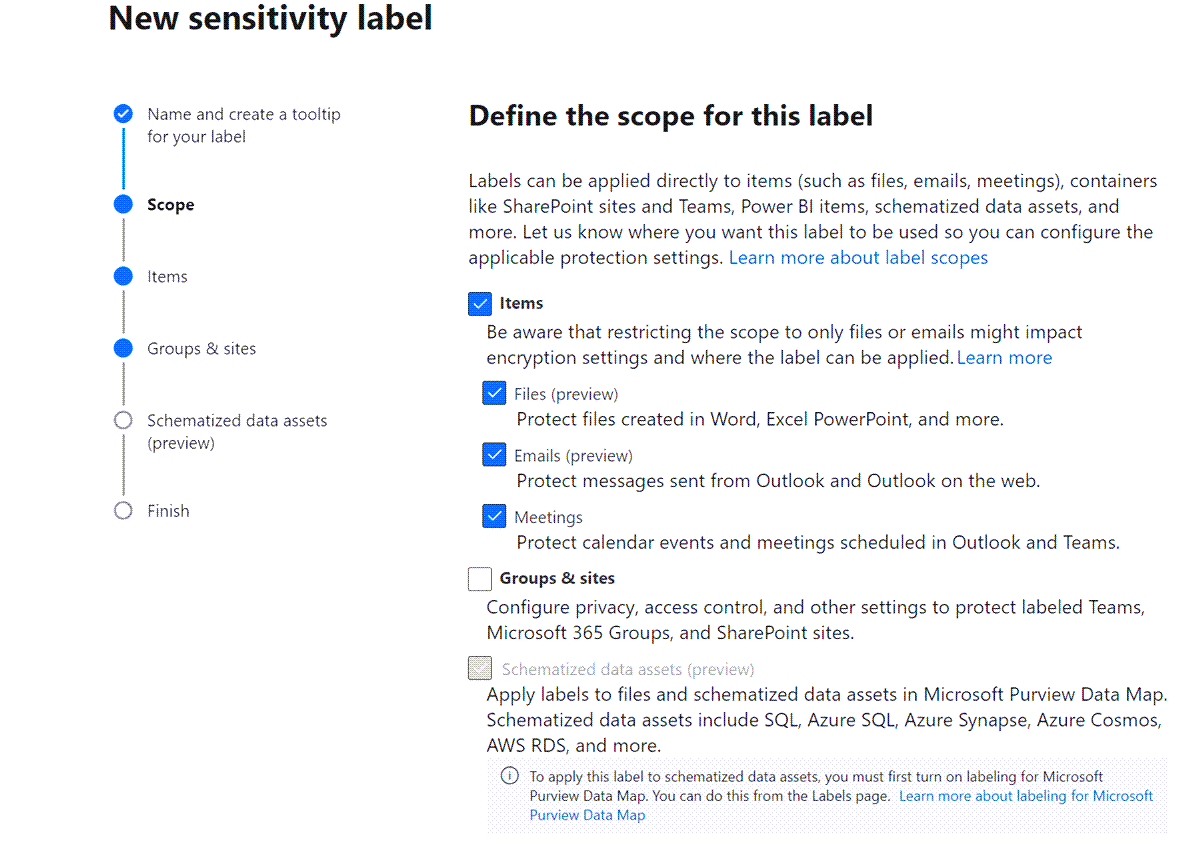
Purview Data Map is a third lesser-used label scope, that allows Labels to be applied to some Azure assets such as:
- Azure SQL columns
- Azure Cosmos DB
- Azure MySQL
- Azure Data Explorer
Purview Data Labelling is not enabled by default. It can be turned-on in the Information Protection UI, or using the PowerShell compliance module.
PS C:\> Install-Module ExchangeOnlineManagement
PS C:\> Connect-IPPSSession

# Purview Labelling is disabled by default
PS C:\> Get-PolicyConfig | fl purview*

PurviewLabelConsent        : False
PurviewLabelConsentCaller  :
PurviewLabelConsentTime    :
PurviewLabelConsentDetails :

# Enable Purview Labelling:
PS C:\> Set-PolicyConfig -PurviewLabelConsent $True
What’s in a name?
Label names are freeform, configured by an administrator in the Purview Compliance Center. The label display name and description are visible to users and should be intuitive.
Items and Containers can only have one Sensitivity Label (although they can also have an M365 Retention Label - a separate topic).
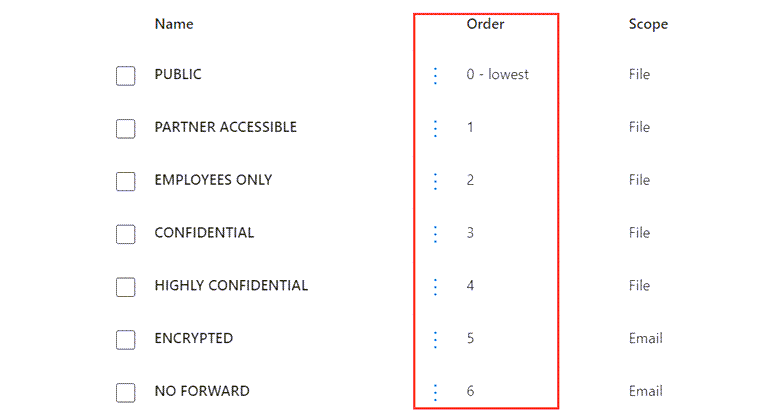
Example Labels
The following example is a baseline set of labels published to everyone in an organization:
| LABEL NAME | Scope | Description |
|---|---|---|
| PUBLIC | Items - Files | Freely shared with anyone inside and outside the organization |
| PARTNER ACCESSIBLE | Items - Files | Shared within the organization and with trusted partners |
| EMPLOYEES ONLY | Items - Files | Only shared within the organization. Encrypted and limited to any member of the organization |
| CONFIDENTIAL | Items - Files | Sensitive information. Encrypted with permissions set by the owner |
| HIGHLY CONFIDENTIAL | Items - Files | Do not share - Regulated data such as PII, GDPR, HIPPA, or Company secret. Encrypted and limited to a predefined group |
| BLUEPRINT | Items - Files | Company-specific design document. Encrypted |
| ENCRYPTED | Items - Email | Encrypted |
| NO FORWARD | Items - Email | Encrypted. Forwarding disabled |
| OPEN ACCESS | Groups & Sites | Employees can join freely and invite external guests |
| INVITE ONLY - External | Groups & Sites | Employees must be invited. Owners can invite external guests |
| INVITE ONLY - Internal | Groups & Sites | Employees must be invited. No external guests |
Sub labels
Sub labels are used to group similar labels in a parent-child relationship. They are mainly for organisation, there’s no inheritance of settings (although they do inherit the colour setting).
In the example below, Confidential is the parent label and Partners and Employees are the two sub labels.
CONFIDENTIAL
CONFIDENTIAL\PARTNERS
CONFIDENTIAL\EMPLOYEES
To create a sub label, click the kebab menu (3-dots) next to an existing label and select Create Sublabel.

Manage Labels with PowerShell
PS C:\> Install-Module exchangeonlinemanagement -MinimumVersion 3.0.0
PS C:\> Connect-IPPSSession

# Create a new label
PS C:\> New-label -ContentType "File" -Name "EMPLOYEES ONLY" -DisplayName "EMPLOYEES ONLY" -Tooltip "Only shared within the organization. Encrypted"

# Change label priority
PS C:\> Set-Label -Identity "EMPLOYEES ONLY" -Priority 2
Label Settings
Sensitivity Labels aren’t just visual markings. They can apply permissions and privacy controls:
| Control | Scope | Description |
|---|---|---|
| ENCRYPTION | Items | Usage Rights: View,Edit,Save,Print,Copy,Allow Macros Whether access expires If it can accessed offline. |
| CONTENT MARKING | Items | Background Watermark (DOCX/PPTX) Header Footer |
| ENCRYPTION | Email Messages | Reply, Reply All, Forward Encrypt only |
| PRIVACY and EXTERNAL ACCESS | Containers | Membership: Public, Private, None(Defined by users) Ability to add guests |
| EXTERNAL SHARING AND CONDITIONAL ACCESS | Containers | SharePoint external sharing options |
Label Priority
Labels have a priority with (1) being least sensitive e.g. Public. The priority order is used to identify downgrading and to resolve conflicts.
Downgrading occurs when users manually change a label to a less sensitive option. An Item Owner (person who applied the label) is free to change it.
Label Policies
Label Policies have two purposes:
- Publishing labels so they are visible in supported apps
- Controlling how labels are applied
Publishing Labels
Sensitivity Labels are published to users, either everyone in the organization, or a selected [mail-enabled] group. This is different to Retention Labels that are published to storage locations.
Controlling how labels are applied
The following options are available in a Label Policy, depending on the Label scope.
| Control | Description |
|---|---|
| Downgrade justification | Prompt user for a reason when changing to a lower priority label or removing a label |
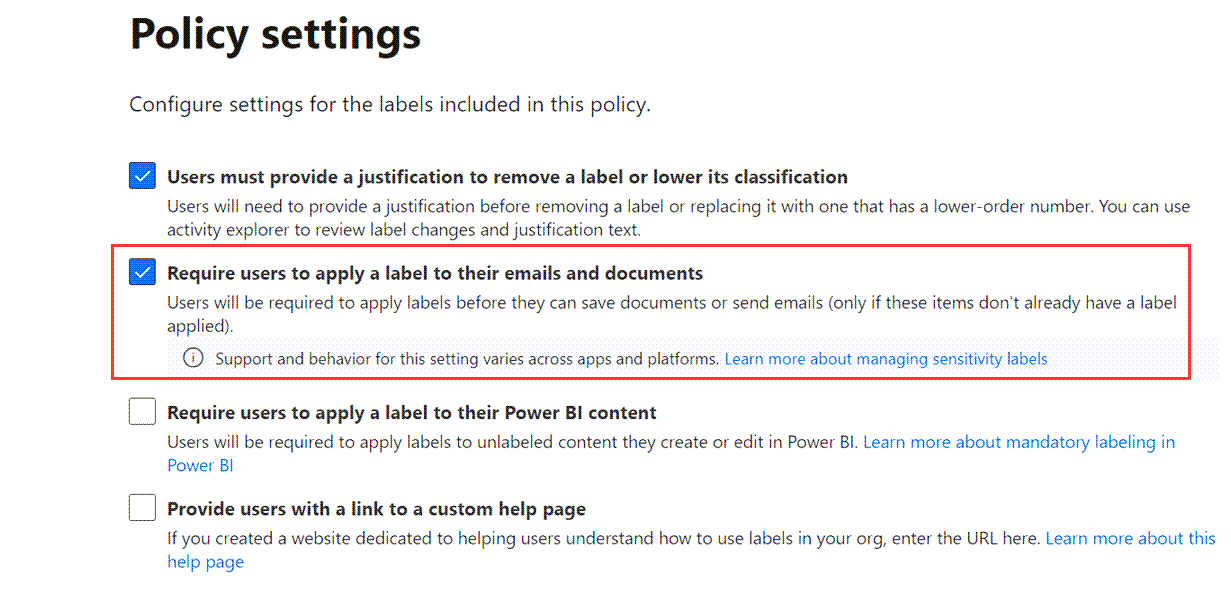
| Mandatory labelling | Users are forced to apply a label before saving (files) or sending (emails) if the item doesn’t already have a label |
| Help Link | A URL to a page with user guidance. The link will be available on the Sensitivity button in MS Office |
| Mandatory Power BI labelling | Not covered in this article |
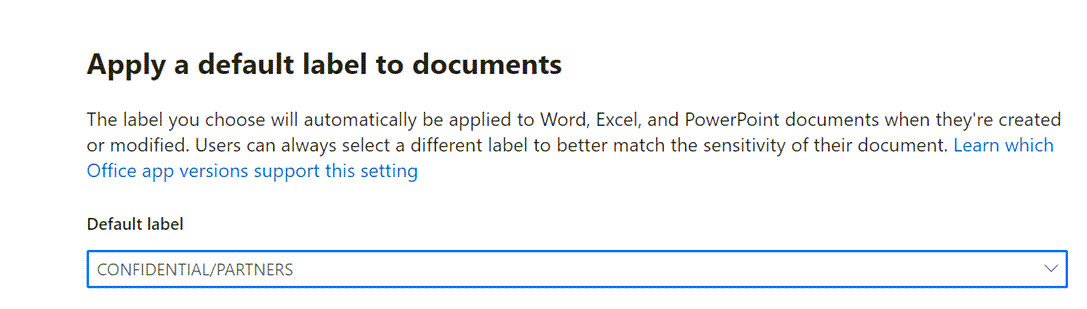
| Default Document Label | Automatic client-side labelling in supported apps. Applied to new and modified items. Users can override |
| Default Email Label | Automatic client-side labelling in supported apps. Applied to new and existing items. Users can override |
| Default Calendar Label | Automatic client-side labelling in supported apps. Applied to new and existing meetings. Users can override |
| Default Sites & Groups Label | Applied to new SharePoint Sites and M365 Groups. Owners can override |
| Default Power BI Label | Applied to new dashboards, reports and datasets. Users can override. |
Default vs Mandatory Labelling
User adoption is one of the key challenges of Sensitivity Labelling. The following options exist to help with this challenge:
- Default Labels
- Mandatory Labelling
- Automatic Labelling
It can be difficult to decide between default and mandatory labelling. If you configure default labels in the Label Polices, it will achieve the high-level goal of wide adoption, but it may fail to achieve a useful implementation. Users can just accept the default and make no effort to change it to something more appropriate.
For this reason, mandatory labelling may be a better choice, forcing users to choose a label when they save a new item or modify an unlabelled one. If you enable mandatory labelling, make sure the Label Display Names and Descriptions are intuitive and explain details like encryption.
Mandatory Labelling = Require users to apply a label to their emails and documents.
Encryption, Permissions and Usage Rights
Sensitivity Labels use AES 256 symmetric encryption to control access to items. Supported apps, such as Word, Excel, PowerPoint, will seamlessly decrypt the item if the recipient is authenticated and authorised. Encryption is not limited to users within the organization, external recipients are also supported.
Document metadata is not encrypted, allowing other applications to read the Sensitivity Labels on a document regardless of whether it is encrypted. Exchange Online and SharePoint (when enabled) are able to remove encryption and re-apply it, allowing them to index and scan content.
There are two aspects that control access to protected items:
- Permissions
- Usage Rights
Assigning Permissions
The following permission options control who can authenticate for access to a protected item:
| Assignee | Description |
|---|---|
| All users and groups in your organisation | Any user in your Tenant |
| Any authenticated user | Users in any Azure AD Tenant, personal MSA accounts, Federated accounts (GMail, Yahoo), Guests, OTP authenticated B2B accounts |
| Users or groups | Specific users or groups in your Tenant |
| Specific email addresses or domains | Individual external recipients or entire external email domains |
External recipients are fully supported by the above options. If authentication fails the item cannot be opened.
Usage Rights and Permission Levels
Once the recipient is authenticated, the Publishing License attached to an encrypted item is checked to determine what usage rights have been assigned.
Usage rights are granular controls over common activities as follows:
| Right | Scope | Description |
|---|---|---|
| View content (VIEW) | Files | Enables document opening and viewing content. Doesn’t allow sorting or filtering in Excel |
| View rights (VIEWRIGHTSDATA) | Files | Enables viewing the document protection policy |
| Edit content (DOCEDIT) | Files | Enables document modify, rearrange, sort content. Not Save or Change Tracking |
| Save (EDIT) | Files | Enables document Save and Save As (Open XML format only) |
| Print (PRINT) | Files | Enables document printing |
| Copy and extract content (EXTRACT) | Files | Enables document copy/paste and screen capture/sharing |
| Reply (REPLY) | Enables email reply, but not changes to recipients. Combine with Save and Edit content to work correctly | |
| Reply all (REPLYALL) | Enables email reply all, but not changes to recipients. Combine with Save and Edit content to work correctly | |
| Forward (FORWARD) | Enables email forward or adding recipients. Combine with Save and Edit content to work correctly | |
| Edit rights (EDITRIGHTSDATA) | Files | Enables changing the protection policy, including removing protection |
| Export content (EXPORT) | Files | Enables document SaveAs to other formats and integrations such as Send to OneNote |
| Allow macros (OBJMODEL) | Files | Enables run macros option in documents |
| Full control (OWNER) | Files | Enabled all rights to a document including remove protection |
Caveats: Save (EDIT) only grants Save/Save As in the Desktop versions of Office, but it also grants Edit rights in Office for the Web.
Permission Levels are groups of usage rights that meet the most common requirements, as follows:
| Permission Level | Scope | Description |
|---|---|---|
| Viewer | Files | Open, Read, View rights, Allow macros |
| Reviewer | Files & Email | Open, Read, Save, Edit content, View rights Reply, Reply All, Forward |
| Co-Author | Files & Email | Open, Read, Save, Edit content, View rights, Copy, Export, PrintReply, Reply All, Forward |
| Co-Owner | Files & Email | Open, Read, Save, Edit content, View rights, Copy, Export, Print, Change RightsReply, Reply All, Forward,Full Control |
Co-Authors and Co-Owners can Copy, Export and Print from documents. Co-Owners can change or remove document protection.

PDF Support
PDF files can be encrypted and Adobe Acrobat / Acrobat Reader will show a banner message to indicate the applied Sensitivity Label. Since June 2022 versions of Acrobat and Acrobat Reader no longer need a separate plugin.
MS Edge version 83.0.478.37 or higher can also view encrypted PDF files.
If you Save or Print an encrypted Office document to PDF, the resulting PDF will inherit the encryption and permissions.
Content Marking
Content Marking puts visual markers directly in the data, specifically, the header, footer or background of a file item and header or footer of an email.
This can be useful as the label is hidden in the item metadata and only displayed in the UI of supported applications. Furthermore, the label only displays in the UI if the Tenant ID in the metadata matches the current Tenant.
In practice, content marking may be as simple as ensuring the Label is clearly visible in the document, or it could be a lengthy paragraph explaining who is allowed to read the content and how it can be shared. Headers and Footers can be up-to 1024 characters in Word and PowerPoint and up to 255 in Excel.
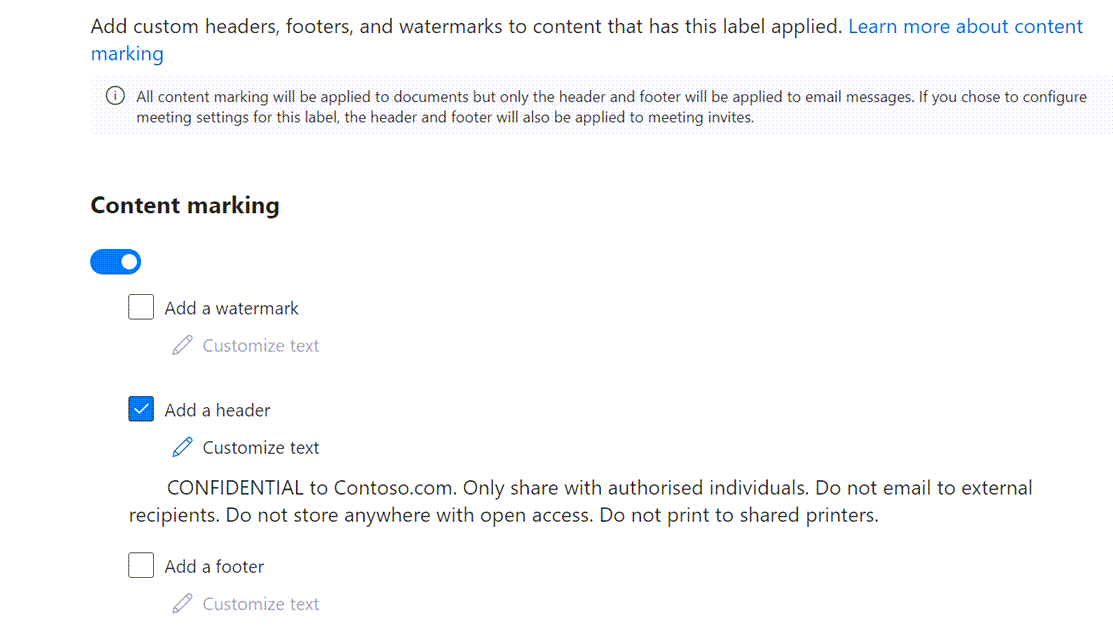
Background Watermarks are not supported in email and are normally only be used for high sensitivity documents e.g. to print Confidential diagonally in the background.
Dynamic Content Marking
Content Marking supports basic conditions and variables, most commonly used to apply different marking based on the document type.
An IF condition can include the name of an Office application, or the single character abbreviation for multiple applications, as shown in the Header marking examples below:
# LABEL POLICY EXAMPLE 1 - Only mark Excel files
${If.App.Excel} CONFIDENTIAL SPREADSHEET: INTERNAL RECIPIENTS ONLY ${If.End}
Even though the label applies to Word, Excel and PowerPoint files, the header marking is only applied to Excel files
# LABEL POLICY EXAMPLE 2 - Target multiple apps
${If.App.WXP} PUBLIC: DISTRIBUTE FREELY ${If.End}
In the second example, the header marking is added to Word, Excel and PowerPoint files, but not Outlook emails.
# LABEL POLICY EXAMPLE - multiple options
${If.App.WO} ${Item.Label} - This content is confidential. ${If.End} ${If.App.PowerPoint} ${Item.Label} - This presentation is confidential. ${If.End}
In the third example, the header is different for Word and Outlook compared to PowerPoint (and Excel does not apply a header).
Dynamic Content Variables
There are only a few variables that can be used in content marking:
| Variable | Description |
|---|---|
| ${Item.Label} | The label display name |
| ${Item.Name} | File name or email subject of the document |
| ${Item.Location} | Full path to document or email subject |
| ${User.Name} | Display name of user applying the label |
| ${User.PrincipalName | UPN of user applying the label |
| ${Event.DateTime} | DateTime when label is applied |
Information Protection Licensing
Office 365 E3 includes Information Protection for Office 365 – Standard and Office 365 E5 includes Information Protection for Office 365 – Premium. Broadly these map to manual and automatic labelling. Information Protection is a separate Service Plan with a SKU, allowing it to be selectively enabled for specific users / groups.
An O365 E3 license covers most requirements for manual labelling:
- Manual labelling (Sensitivity Labels and Retention Labels) using M365 Apps for Enterprise, Office Online and Office mobile
- Manual labelling for containers (Teams / SharePoint / M365 Groups)
- Basic Office Message Encryption (OME) including Encrypt only and Do Not Forward email templates
- DLP for Exchange Online and SharePoint Online
NOTES:
DLP for Teams requires an Office E5 license. Administrators and M365 Group Owners need an Azure AD P1 license to apply labels to containers (included in E3 and E5).
An Office E5 license is needed for most automatic labelling actions and the following:
- Automatically applying Sensitivity Labels and Retention Labels
- Default container labels inherited by unlabelled documents (e.g. SharePoint)
- Bring Your Own Key (BYOK) and Hold Your Own Key (HYOK) encryption
- Double Key Encryption (DKE)
- Sensitivity Labels for PowerBI
NOTES:
Alternative licensing - add one of the following to an E3 license: Microsoft 365 E5 Compliance, Microsoft 365 E5 Information Protection and Governance, Advanced OME and customer key for Office 365. Refer to the downloadable spreadsheet Microsoft 365 Compliance Licensing Comparison for more information.
Role Based Admin Delegation
M365 administrators working with Information Protection need delegated access to the configuration settings in the Purview Compliance Center. Add users to one of the following built-in roles:
- Global Administrator
- Compliance Data Administrator
- Compliance Administrator
- Security Administrator
Alternatively, create a custom Azure AD role group and add one of the following:
- Organization Configuration
- Sensitivity Label Administrator
- Sensitivity Label Reader
To review Data Classification Reports (e.g. simulation mode results) you need:
- Content Explorer List viewer
- Content Explorer Content viewer
This article was originally posted on Write-Verbose.com