Part two of a deep dive series on Purview Sensitivity Labels:
Part 1 - Manual Labelling
Part 2 - Automatic Labelling
Part 3 - Recommendations and Limitations
Automatic Labelling
Manual Labelling is often the introduction to Sensitivity Labels, but eventually you will want to look at automation. In particular, it will be needed to add coverage of data at rest. Manual labelling, even if mandatory, only applies when an existing file is re-saved.
The main blocker for many companies is that Automatic Labelling is not available with an E3 license. It requires either Microsoft 365 E5, or E3 plus Microsoft 365 E5 Compliance or Microsoft 365 E5 Information Protection and Governance.
There are two options for automatically applying Sensitivity Labels:
- Client-side auto-labelling for files and emails
- Service-side auto-labelling for SharePoint Online, Exchange Online and OneDrive
Client-side Auto-labelling
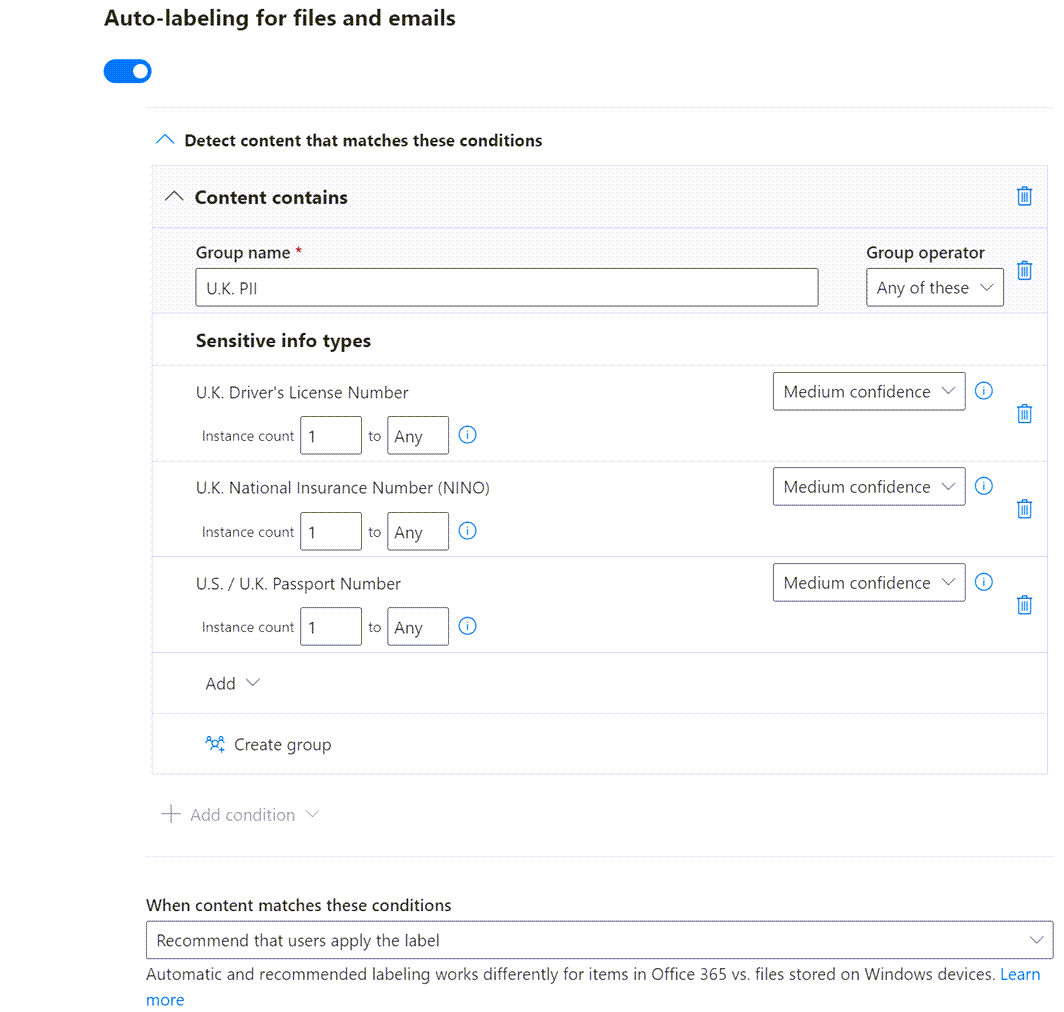
Auto-labelling for files and emails is a client option, configured per-label, that either automatically applies the label, or recommends it to the user based on pattern matching in the content.
Client-side auto-labelling only occurs when an item is being created or edited, it doesn’t apply to data at rest or in-transit. The auto-label policy is based on matching one or more Sensitive Info Types or Trainable Classifiers. For example, if the content matches a passport number.
Service-side auto-labelling
Service-side auto-labelling is a separate option in the Information Protection blade of the Purview Compliance Center. This option is not dependent on supported client apps or reliant on user adoption. Labels are applied by the back-end M365 services.
Create an Auto-labelling policy to apply one of the pre-defined labels to unlabelled data at rest in supported locations.
The policy wizard has pre-defined Templates for matching content based on well-known regulatory and enterprise requirements. For example, the UK Financial Template includes the Sensitive Info Types that match credit card numbers, debit card numbers and SWIFT bank codes in the scanned content.
Alternatively, the Custom Template option creates a policy with bespoke pattern matching, as follows…
First select one or more of the supported storage locations to apply the automatic labelling:
- Exchange Online
- SharePoint Online
- OneDrive for Business
SharePoint and OneDrive both support auto-labelling of data at rest. Exchange Online only supports auto-labelling of data in-transit.
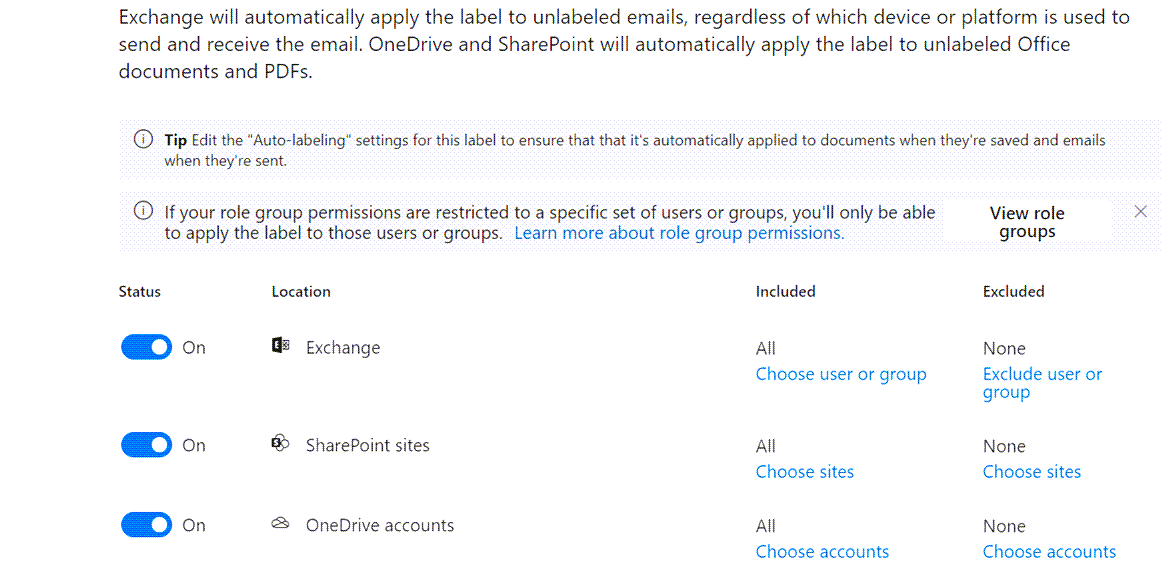
Next create rules containing include and exclude Conditions to identify items in-scope. A rule can contain multiple conditions and it can apply to all three storage locations, or be specific to a particular one.
Conditions available for SharePoint Online and OneDrive for Business:
| Condition | Description |
|---|---|
| Content is shared | Inside or Outside the organisation |
| Content Contains | Sensitive Info Types and/or Trainable Classifiers |
Exchange Online has many additional Conditions:
| Condition | Description |
|---|---|
| Content is shared | Inside or Outside the organisation |
| Recipient Domain is | List of email domains |
| Recipient is | Specific email addresses |
| Sender IP Address | Specific IPv4 address or a range |
| Sender domain is | List of email domains |
| Sender is | Specific email addresses |
| Attachment file extension is | List of file extensions |
| Attachment is password protected | Detects email attachments with password protection |
| Attachment’s content could not be scanned Attachment’s content didn’t complete scanning | Detects emails with attachments that can’t be scanned |
| Header matches pattern | Regex match on portion of email header |
| Subject matches pattern | Regex match on email subject |
| Recipient address contains words Recipient address matches pattern | List of words in recipient address or match to regex pattern |
| Sender address matches words Sender address matches pattern | List of words in sender address or match to regex pattern |
| Content Contains | Sensitive Info Types and/or Trainable Classifiers |
The additional conditions are only available for Exchange when creating a per-location rule.
Simulation mode is a mandatory step in creating an auto-labelling policy. Content discovery takes place and the administrator can review matched items to ensure rules are correct. The policy can then be turned-on for real.
Sensitive Information Types
Sensitive information Types are search patterns for named data types. They are used to automatically classify content that matches the pattern, for example:
- US / UK Passport number
- SWIFT code
- Japan Social Security Number
- Credit Card Number
- Azure AD client secret
Sensitive Info Types can be used in Client-side and Service-side auto-labelling.
There is a long list of built-in Sensitive Information Types (SIT) provided by Microsoft. You can also create your own in the <em>Data Classification</em> blade of the Purview Compliance Center. Custom SITs are one of the following:
Pattern-based SIT
When you create a pattern-based Sensitive Info Type, you can specify a Primary element and Supporting elements. The elements consist of the following options:
- Regular Expression
- Keyword list
- Keyword dictionary (longer list of keywords)
- Existing Sensitive Info type
The Secondary Element can be a list of the above, grouped by Any, All or None. The Primary Element and Supporting Elements can be anywhere in the document or near each other within a specified number of characters.
Fingerprint-based SIT
A Fingerprint-based Sensitive Info Type is created by uploading an example document. It works best with Forms and Templates.
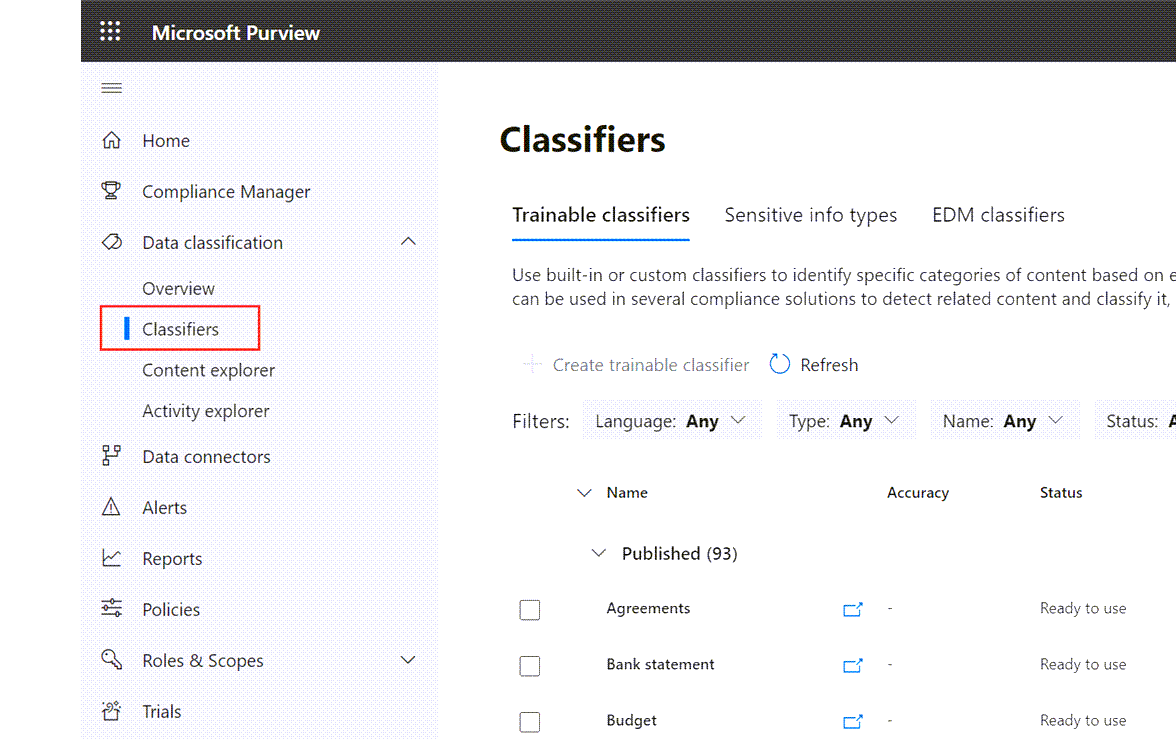
Trainable Classifiers
This method of automatic-labelling is based on machine learning. A Classifier is trained to recognise a document through examples. The classifier must first be fed a selection of documents that are in-scope and out-of-scope of the required label. The administrator must confirm or reject the automatic classification to train the learning model. It can then be applied to a bulk repository such as a document library.
Microsoft provides many “ready-to-use” classifiers, including ones to detect profanity, threats and discrimination and even resumes (CVs). Creating a custom Trainable Classifier requires at least 50 sample documents. It can take up-to 2 weeks to scan your environment using these classifiers.
Trainable Classifiers can be used in Client-side and Service-side auto-labelling. They can also be used to apply Retention Labels.
Exchange Mail Flow Rules
Encryption can be applied using Labels in Exchange Mail Flow rules. This option may be an attractive alternative if you don’t have an E5 license that supports Automatic Label Policies. The Label and associated encryption is applied to messages in transit (not messages at rest in mailboxes).
Create a Rule as follows…
In the Exchange Admin Portal, select Mail Flow > Rules > Add a rule
In the drop-down list select the option to Apply Office 365 Message Encryption and rights protection to messages
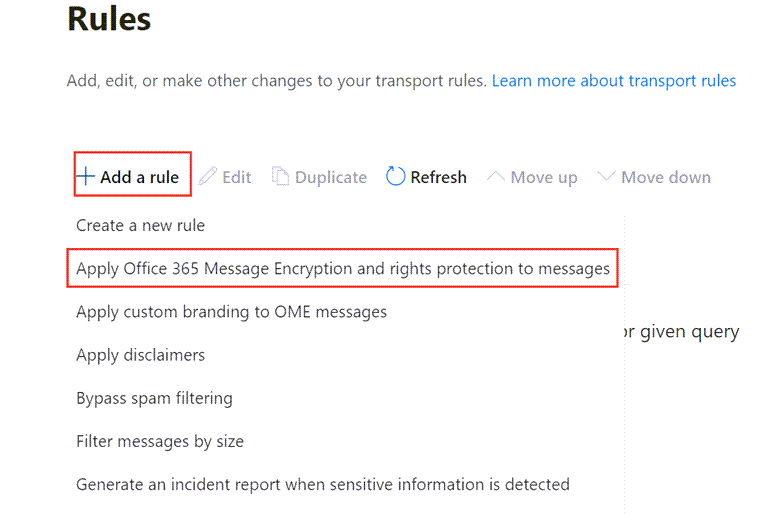
Complete the Rule Conditions and select Rights protect message with [SELECTED LABEL]
SharePoint Default Sensitivity Label
You can set a default Sensitivity Label for SharePoint content and it will apply to documents uploaded or re-saved in a Library. The setting can be applied at the Site Level (Settings > Site Information) or the Library Level (Settings > Library Settings). It requires Site Admin permissions.
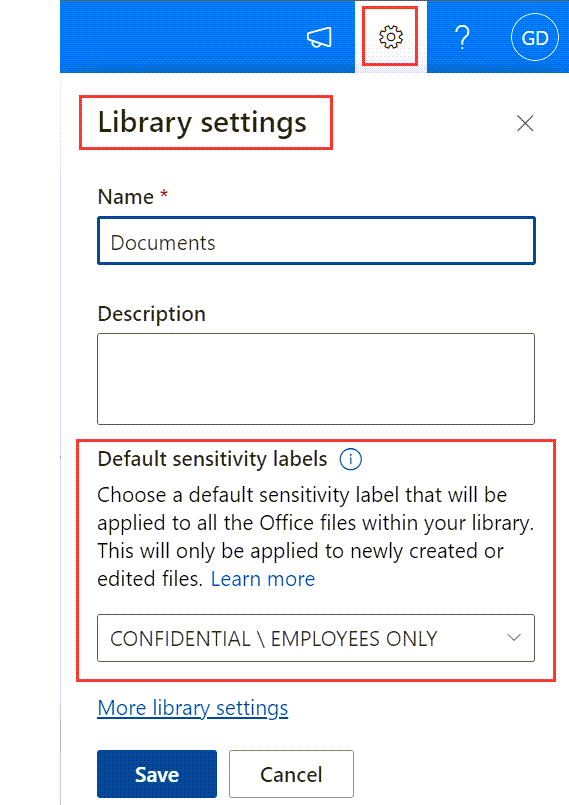
A manually-applied label will always win over a SPO Library default. The Library setting can override an auto-labelling policy or label policy default setting, if the Library setting is higher priority.
A SharePoint default Label only applies to new document uploads. Existing files in the Library only receive the Label when they are re-saved.
Labels with the following settings can’t be used as a SharePoint default label:
- A Label with encryption set to Let users assign permissions when they apply the label
- A Label set to In Word, PowerPoint and Excel, prompt users to specify permissions
If a user manually removes encryption from a labelled document in a SharePoint Library, the encryption will be restored the next time it is accessed or downloaded.
The automatic Labelling process does not affect the Last Modified date of files.
NOTE that an SPO Default Label is different to Label Policies that target SharePoint. Label Policies apply container settings such as external access.
SharePoint Sensitivity column
Don’t forget to update the All Documents view to show a column for Sensitivity
In a Library > Add column > Show or hide columns > Select Sensitivity > Apply Then click the All Documents drop-down and select Save view as, leave the default “All Documents” and click Save
The Library will then always show the Sensitivity Label alongside the File Name and Modified Date.
Protecting Teams Meetings and Chat
A Label can be applied to Teams meetings and Chat if the following are true:
- Organization has a Teams Premium license (included in E5 but not E3)
- The Label is scoped to both Files and Emails
- The meeting owner is using M365 Apps for Enterprise or OWA on a Desktop computer (not supported on mobile apps)
When encryption is turned-on, the following controls can be configured by the Label:
- Who can bypass the lobby
- Who can present, record
- Automatic recording
- Prevent copy of meeting chat
- Add a watermark during screen sharing and camera streams
What is Azure Information Protection?
Azure Information Protection (AIP) extends what is available in Purview Information Protection and also provides some of the services used by Purview Information Protection. In its original form AIP used separate Sensitivity Labels managed in the Azure Portal. Since 2019, AIP has been updated with a Unified Labelling Client that uses Purview Sensitivity Labels.
The following are some reasons to extend the Data Classification Framework with AIP:
- Bulk labelling and protection of on-prem file shares and SharePoint libraries
- Bulk decryption for data recovery
- Apply labels directly from File Explorer or PowerShell
- Supports additional file types for classification and protection
- Supports Office 2003-2007 file formats
- Logging to the Windows event log
To use AIP you will need to deploy the unified labelling client to Windows computers. You may see references in documentation to the AIP Classic Client. This is the older version of AIP that is now deprecated.
If the AIP client is installed, the built-in labelling interfaces in Office are disabled (e.g. the Ribbon Sensitivity button) and an Office add-in displays an information bar instead. It’s a supported scenario to use AIP for some features while still using the built-in labelling for Office. To achieve this, just disable the AIP Office add-ins (MSIP.WordAddin, MSIP.ExcelAddin, MSIP.PowerPointAddin, MSIP.OutlookAddin) using a Group policy / CSP setting.
AIP Unified Labelling Scanner?
The Scanner works by running jobs that crawl the specified data stores to label and protect the documents. This can be a one-off exercise to ensure wide coverage (then relying on native labelling options), or it could be a repeat scheduled process.
The Scanner runs as a service on a Windows Server (2016 or later for long path support) and also requires a SQL server backend. It requires an application registration in Azure AD, that provides a token for the service to authenticate with AIP. The scan jobs are configured in the AIP blade of Azure rather than on the Server.
The process of scanning large data stores can be time consuming, so the Scanner supports inclusion and exclusion by file type (file extension) to pre-filter the file list. It can also be clustered with multiple servers working in parallel. It uses the same built-in iFilters used by Windows Search to access document content and look for matches to automatic label patterns.
The Scanner can be run first in Discovery Mode to create a report of labels and protection that would be applied through automatic classification rules.
AIP Supported file types for scanner inspection
.doc, docx, .docm, .dot, .dotx, .xls, .xlt, .xlsx, .xlsm, .xlsb, .ppt, .pps, .pot, .pptx, .pdf, .txt, .xml, .csv
This article was originally posted on Write-Verbose.com